DPS310-ESP32微気圧計のデータ処理備忘録 2024-06-08

Data processing reminder for the DPS310-ESP32 micro-barometer

製作記事(工事中)
DPS310micro-barometer making recipe (under construction, coming soon)

現行1秒サンプリングデータ及び下記1秒化サンプリングデータの分処理.ChatGPT会話ののちの修正入りスクリプト.
/home/seagull/Desktop/微気圧計続き2024/ESP32/Jin_data/2023_test2
に格納.いずれのデータも60秒間の移動平均を計算して,分ごとに出力.

Script with modifications after with ChatGPT discussion.
Stored in /home/seagull/Desktop/Microbarometer continued 2024/ESP32/Jin_data/2023_test

!/bin/bash


# 入力ファイルと出力ファイルの名前を指定します
INPUT_FILE="averaged_PT.txt"
OUTPUT_FILE="minute_moving_average.txt"

# awkスクリプトを変数に格納します
awk_script='
{
    # 日時フィールドを解析
    datetime = $1 " " $2
    pressure = $3
    temperature = $4
   
    # エポック秒に変換
    cmd = "date -d \"" datetime "\" +%s"
    cmd | getline epoch
    close(cmd)
   
    # 分単位のキーを作成(分の開始時間)
    minute_key = int(epoch / 60) * 60

    # 各分のデータを配列に格納
    pressures[minute_key][epoch] = pressure
    temperatures[minute_key][epoch] = temperature
    timestamps[minute_key] = minute_key
}

END {
    for (minute_key in pressures) {
        sum_pressure = 0
        sum_temperature = 0
        count = 0

        # 各分の過去60秒間のデータを集計
        for (epoch in pressures[minute_key]) {
            if (epoch >= minute_key - 59 && epoch <= minute_key) {
                sum_pressure += pressures[minute_key][epoch]
                sum_temperature += temperatures[minute_key][epoch]
                count++
            }
        }

        if (count > 0) {
            avg_pressure = sum_pressure / count
            avg_temperature = sum_temperature / count
           
            # 分の開始時間をフォーマット
            cmd = "date -d @" minute_key " \"+%Y/%m/%d %H:%M\""
            cmd | getline formatted_time
            close(cmd)

            print formatted_time, avg_pressure, avg_temperature
        }
    }
}
'

# awkスクリプトを実行し、結果を一時ファイルに保存します
temp_output=$(mktemp)
awk "$awk_script" "$INPUT_FILE" > "$temp_output"

# 出力を時刻でソートし、最終的な出力ファイルに保存します
sort -k1,1 -k2,2 "$temp_output" > "$OUTPUT_FILE"

# 一時ファイルを削除します
rm "$temp_output"

これで,下記の秒処理が分データに出力された.
The following each second data are output.

2023/06/03 22:50 999.645 29.1
2023/06/03 22:51 999.651 29.125
2023/06/03 22:52 999.647 29.1267
2023/06/03 22:53 999.649 29.145
2023/06/03 22:54 999.652 29.145
2023/06/03 22:55 999.645 29.14
2023/06/03 22:56 999.658 29.18
2023/06/03 22:57 999.663 29.18
2023/06/03 22:58 999.66 29.2
2023/06/03 22:59 999.648 29.21
2023/06/03 23:00 999.638 29.22
2023/06/03 23:01 999.622 29.235

気温はともかく,気圧の値は大体秒データの通りだと考えられる.これ正確には一度再計算の必要あり.
ChatGPTが正しいスクリプトを提示しているかどうかの検証.

Aside from the temperature, the atmospheric pressure values are considered to be roughly the same as the second data.
This ChatGPT code should be verified in the future.


古いフォーマットの2-4Hzサンプリングデータの1秒サンプリング化処理.ChatGPTよりの回答
Old format 2-4Hz sampled data to 1 second sampled data from ChatGPT suggestions.


数個の同じ秒内のデータを平均して,秒データとして出力.
Averages several data within the same second and outputs them as second data.

#!/bin/bash

# 入力ファイルと出力ファイルの名前を指定します 
INPUT_FILE="data.txt"
OUTPUT_FILE="averaged_PT.txt"

# awkスクリプトを変数に格納します
awk_script='
{
    # 2つ目のフィールド(日時)を使ってキーを作成する
    key = $1 " " $2
   
    # 3つ目のフィールド(気圧)の末尾のカンマを取り除く
    pressure = substr($3, 1, length($3)-1)
    temperature = $4
   
    # キーに対して気圧と気温を集計する
    sum_pressure[key] += pressure
    sum_temperature[key] += temperature
    count[key]++
}

END {
    for (key in sum_pressure) {
        avg_pressure = sum_pressure[key] / count[key]
        avg_temperature = sum_temperature[key] / count[key]
        print key, avg_pressure, avg_temperature
    }
}
'
# awkスクリプトを実行し、結果をソートして出力ファイルに保存します
awk "$awk_script" "$INPUT_FILE" | sort -k1,1 -k2,2 > "$OUTPUT_FILE"

以上を
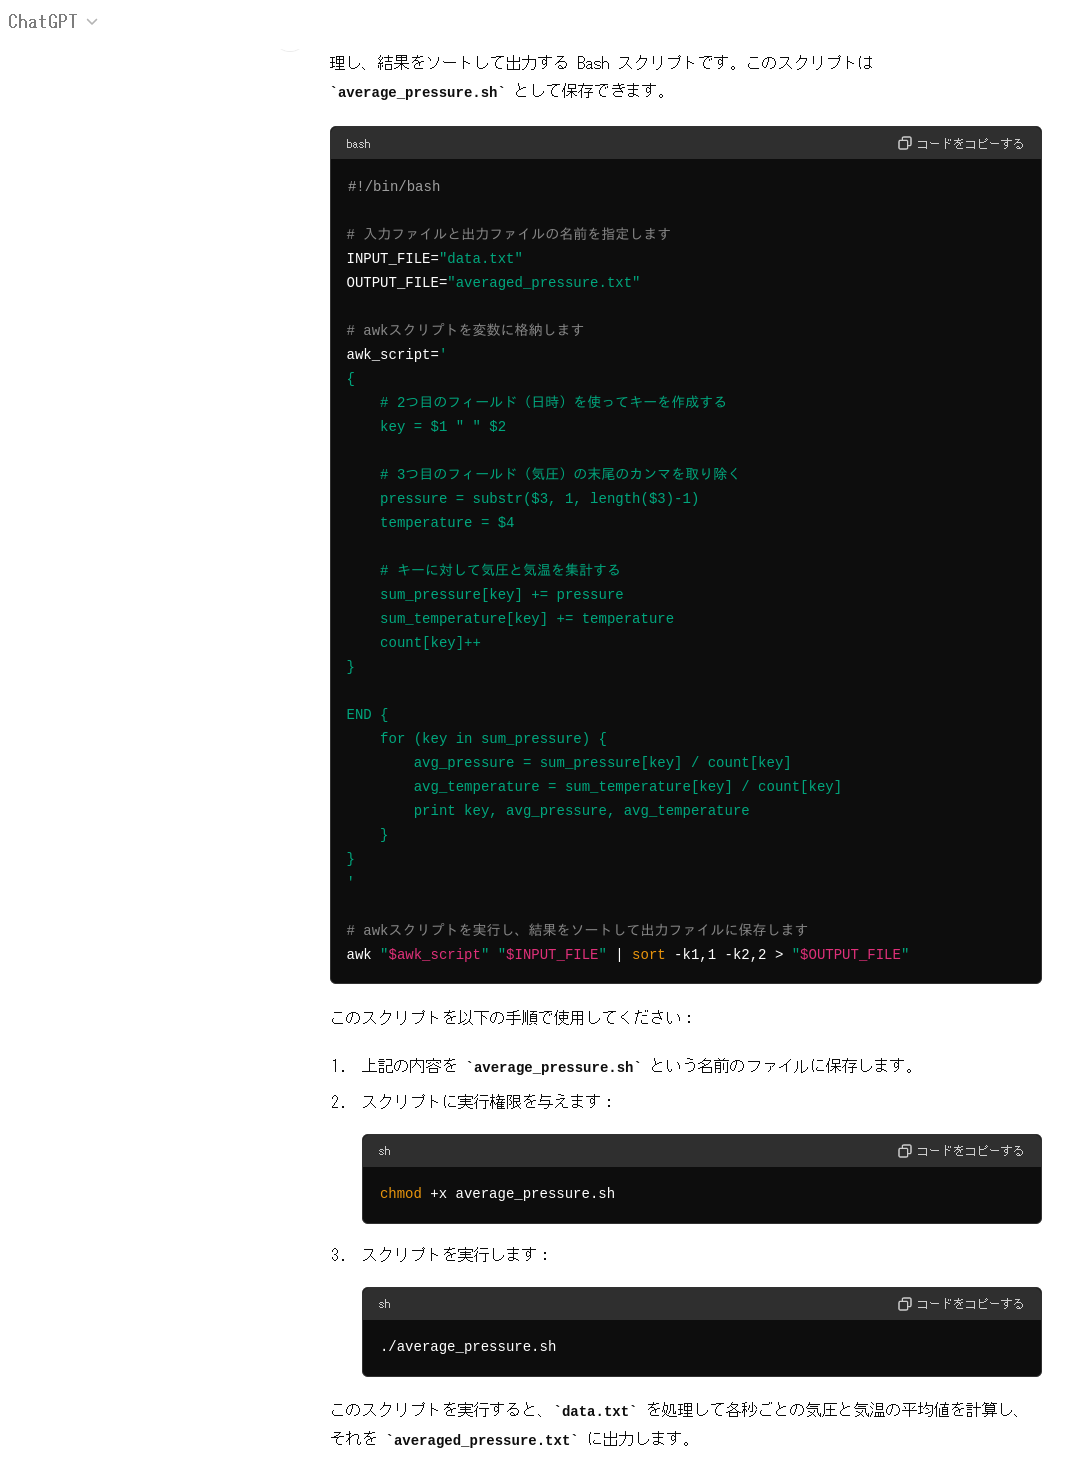
average_PT.shで実行権限をつけて実行.
Execute the above with execution permission in average_PT.sh.

これで秒データは完成.
This completes the second data.
経過は
元データdata.txtの一部
The progress is a part of the original data.txt file.

2023/06/03 22:54:10 999.650, 29.15
2023/06/03 22:54:10 999.652, 29.16
2023/06/03 22:54:11 999.652, 29.15
2023/06/03 22:54:11 999.652, 29.15
2023/06/03 22:54:11 999.651, 29.15
2023/06/03 22:54:12 999.652, 29.15
2023/06/03 22:54:12 999.651, 29.16
2023/06/03 22:54:13 999.650, 29.15
2023/06/03 22:54:13 999.651, 29.16
2023/06/03 22:54:14 999.651, 29.15
2023/06/03 22:54:14 999.650, 29.15
2023/06/03 22:54:15 999.651, 29.15
2023/06/03 22:54:15 999.651, 29.15
2023/06/03 22:54:15 999.652, 29.16
2023/06/03 22:54:16 999.653, 29.16
2023/06/03 22:54:16 999.652, 29.16

これが This turned to

2023/06/03 22:54:10 999.651 29.155
2023/06/03 22:54:11 999.652 29.15
2023/06/03 22:54:12 999.651 29.155
2023/06/03 22:54:13 999.65 29.155
2023/06/03 22:54:14 999.65 29.15
2023/06/03 22:54:15 999.651 29.1533
2023/06/03 22:54:16 999.653 29.16
2023/06/03 22:54:17 999.652 29.16
2023/06/03 22:54:18 999.649 29.15
2023/06/03 22:54:19 999.648 29.1467
2023/06/03 22:54:20 999.649 29.155
2023/06/03 22:54:21 999.65 29.15

のように整形.計算は一応合っている(四捨五入をのぞいて).

The calculations are correct (except for rounding).


前後するが,下記の備忘録

ESP32微気圧計データより1秒ごとのデータ抽出  2024-05-01

https://zenn.dev/nutmeg/articles/awk_select_10より

cat test0.dat | awk '!a[$2]++' > test2.dat

でOK! '!a[$2]++' が重要!

cat test0.dat | awk '!a[$0]++' > test1.dat
だと,気温が更新されているので,重複排除とはならない点に注意!


The following memorandum is a pre/post summary of the following
ESP32 microbarometer data extracted every second 2024-05-01
from https://zenn.dev/nutmeg/articles/awk_select_10
cat test0.dat | awk '!a[$2]++' > test2.dat
The '!a[$2]++' is important!

cat test0.dat | awk '!a[$0]++' > test1.dat
Note that this is not deduplication, since the temperature is updated!


2024 ESP32微気圧計再考        2024-05-04

ESP32S3LCD付きの基板ではまだi2cの認識がどうしてもできない.
i2c_commandは書き込めるが,シリアルモニタで
15:39:05.565 -> FAIL! ret = -2
15:39:06.063 ->
というエラーがどうしても取れない.朝からChatGPTで受け答えするがだめ.仕方なく自転車のあと,こちらはPending!


次に,もとのESP32-3248S035Rの方の基板の書き込みを試してみる.まずi2c_commandが本体基板のBootSWを書き込みの際に押すことで,書き込みが始まりあとはSWを離しても問題なし.
こちらは見事に成功.ここ数日の嵌りが解消!!

その作業の必要性は下記などにかかれてある.

https://macsbug.wordpress.com/2022/10/02/esp32-3248s035/
にはなかったか?
https://qiita.com/hayate2718/items/a35e16f4833218ab45c7
とか
https://klab.hateblo.jp/entry/2021/05/28/172843
など
http://microtechnica.xyz/?p=271
にはその説明.

https://qiita.com/h_nari/items/b971e615688d69bb3564
にはコンデンサを接続する方法も.

これで以前に作ったESP32_DPS310のプログラムも書き込めた.
最新を
ESP32_DPS310v3とした.これを以後使用すること.
現在再度観測中.
あとはサンプリングを現在のフリーランから秒単位に替えたい.これ次の仕事.あと現行までのデータも同様に秒ベースにする.これには以下のスクリプトが有効.

i2cとESP32の接続などは
https://robo.mydns.jp/Lecture/?%C5%C5%BB%D2%B9%A9%BA%EE/ESP32#w86638fa
より,
SCLがGPIO22,SDAがGPIO21で両方を接続.片方では動かないことを確認.⇒SDAの配線も必要!


DSP310 ESP32
GND GND
VCC 3.3V
SDA GPIO021
SCL GPIO022


2024 ESP32微気圧計再考        2024-05-03

ESP32の基板での微気圧計再設定作業.とりあえず下記サイトに戻って,書き込み仕様を確認したところ.

https://macsbug.wordpress.com/2022/11/29/esp32-8048s043/
では無事
Down Load:PDQgraphicstest_LGFX.zip
の書き込みと起動に成功!
これただし,基板認識の際に,
/dev/ttyUSB0
で認識しているかの確認必要(認識されない場合は何度か別のUSBソケットにつないで観ると認識すう場合がある)

こちらの基板で成功したので,以降こちらの基板の使用で考えていく.まず問題はどのようにDPS310を接続するか.
こちらの基板にはi2c用の端子が用意されていないので,SPI接続を考える.まずChatGTPで質問.すると次のような答えが帰ってくる.


ESP32S3                    DPS310 Sensor
-----------------------------------------
MOSI (GPIO) --------------- SDI
MISO (GPIO) --------------- SDO
SCK (GPIO) ---------------- SCK
CS (GPIO) ----------------- CSB
3.3V ---------------------- VDD
GND ----------------------- GND

#include <SPI.h>

#define DPS310_CS_PIN 5 // Example GPIO pin for Chip Select

void setup() {
  // Initialize SPI communication
  SPI.begin();
  // Set CS pin as output
  pinMode(DPS310_CS_PIN, OUTPUT);
  // Deselect the DPS310 sensor
  digitalWrite(DPS310_CS_PIN, HIGH);
}

void loop() {
  // Select the DPS310 sensor
  digitalWrite(DPS310_CS_PIN, LOW);

  // Perform SPI communication with DPS310 here
  // Example: read sensor data

  // Deselect the DPS310 sensor
  digitalWrite(DPS310_CS_PIN, HIGH);

  // Delay for some time before next reading
  delay(1000);
}

しかし具体的なピンアサインは基板により異なるとの回答.ここでほかのサイトを検索.


基板解説ページ
https://macsbug.wordpress.com/2022/11/29/esp32-8048s043/

S3LCD基板裏面図
https://macsbug.files.wordpress.com/2022/10/4280s043_layout-2.pdf

S3参考動画
https://www.youtube.com/watch?v=tgxVE5kpwFw
そのソースコードリンク
https://github.com/hajimef/esp32-s3-demo

さらに旧バージョンとS3のちがい.USB接続
https://www.youtube.com/watch?v=Qg4CKskzTJ8&t=34s

ESP-WROOM-32に関するTIPS byスイッチサイエンス

https://trac.switch-science.com/wiki/esp32_tips#SPI%E9%80%9A%E4%BF%A1

開発環境1:Arduino IDE 設定

// HARD              : ESP32_8048S043C ( ESP32-S3 )
//  Display          : 4.3" 800x480 IPS RGB LCD Touch GT911
// Dev environment   : Arduino IDE 1.8.19
//  Board Manager    : arduino-esp32 2.0.5
//  Board            : "ESP32S3 Dev Module"
//  Upload Speed     : "921600"
//  USB Mode         : "Hardware CDC and JTAG"
//  USB CDC On Boot  : "Disable"
//  USB Firmware MSC On Boot : "Disable"
//  USB DFU On Boot  : "Disable"
//  Upload Mode      : "UART0 / Hardware CDC"
//  CPU Frequency    : "240MHz (WiFi/BT)"
//  Flash Mode       : "QIO 120MHz"
//  Flash Size       : "16MB (128Mb)"
//  Partition Scheme : "16MB Flash (2MB APP/12.5MB FATFS)"
//  Core Degug Level : "None"
//  PSRAM            : "OPI PSRAM"
//  Arduino Runs On  : "Core 1"
//  Events Run On    : "Core 1"
//  Erase All Flash Before Sketch Upload : "Disable"
//  Pord             : "dev/cu.wchusbserial14240"

ESP32-S3-WROOM-1 datasheet
https://www.espressif.com/sites/default/files/documentation/esp32-s3-wroom-1_wroom-1u_datasheet_en.pdf

LCD
https://www.waveshare.com/4.3inch-capacitive-touch-lcd.htm

i2c接続のピンアサイン例(これ役立った!)

https://www.instructables.com/Arduino-Thin-Client/


販売
https://ja.aliexpress.com/item/1005004788147691.html?gatewayAdapt=glo2jpn
3151円


しかし,下記の方は(これすでにDPS310を配線ずみ)
https://macsbug.wordpress.com/2022/10/02/esp32-3248s035/
Down Load : Life_Game_ESP32_3248S035.zip
で書き込みをしようとするが,どうしても下記のエラーが出て

Arduino:1.8.19 (Linux), ボード:"ESP32 Dev Module, Disabled, Disabled, No OTA (2MB APP/2MB SPIFFS), 240MHz (WiFi/BT), QIO, 80MHz, 4MB (32Mb), 115200, Core 1, Core 1, None, Disabled"

警告:ライブラリESP Insightsのカテゴリ「」は有効ではありません。「Uncategorized」に設定します。
警告:ライブラリESP RainMakerのカテゴリ「」は有効ではありません。「Uncategorized」に設定します。
警告:ライブラリWiFiProvのカテゴリ「」は有効ではありません。「Uncategorized」に設定します。
Archiving built core (caching) in: /tmp/arduino_cache_796625/core/core_esp32_esp32_esp32_JTAGAdapter_default,PSRAM_disabled,PartitionScheme_no_ota,CPUFreq_240,FlashMode_qio,FlashFreq_80,FlashSize_4M,UploadSpeed_115200,LoopCore_1,EventsCore_1,DebugLevel_none,EraseFlash_none_ae947a3e98433dfb01eef41ba2e57759.a
最大2097152バイトのフラッシュメモリのうち、スケッチが904993バイト(43%)を使っています。
最大327680バイトのRAMのうち、グローバル変数が47940バイト(14%)を使っていて、ローカル変数で279740バイト使うことができます。
python3 /home/seagull/.arduino15/packages/esp32/tools/esptool_py/4.5.1/esptool.py --chip esp32 --port /dev/ttyUSB0 --baud 115200 --before default_reset --after hard_reset write_flash -z --flash_mode dio --flash_freq 80m --flash_size 4MB 0x1000 /tmp/arduino_build_916219/ESP32_DPS310.ino.bootloader.bin 0x8000 /tmp/arduino_build_916219/ESP32_DPS310.ino.partitions.bin 0xe000 /home/seagull/.arduino15/packages/esp32/hardware/esp32/2.0.15/tools/partitions/boot_app0.bin 0x10000 /tmp/arduino_build_916219/ESP32_DPS310.ino.bin
esptool.py v4.5.1
Serial port /dev/ttyUSB0
Connecting...スケッチの書き込み中にエラーが発生しました
.

A serial exception error occurred: Could not configure port: (5, 'Input/output error')
Note: This error originates from pySerial. It is likely not a problem with esptool, but with the hardware connection or drivers.
For troubleshooting steps visit: https://docs.espressif.com/projects/esptool/en/latest/troubleshooting.html


「ファイル」メニューの「環境設定」から
「より詳細な情報を表示する:コンパイル」を有効にすると
より詳しい情報が表示されます。

でこれは数日前からの状態と同じでとりあえずこの基板の使用を今回はPending.


びCopyright(c) by Y.Okamoto 2024, All rights reserved.